Un layout es el diseño de nuestra vista o pantalla en la que pondremos todos nuestros controles que tendrán interacción con el usuario como EditText,Botones, etc. Este control se genera y ordena con en un archivo XML teniendo diferentes tipos de Layout para diferentes necesidades.
3.1.1 Tipos de Layout
Existen diferentes tipos de Layout para ordenar el contenido de diferentes formas en pantalla.
LinearLayout
El LinearLayout apila todos los elementos hijo que tiene uno detrás de otro y puede ser en vertical (uno debajo de otro)
<?xml version="1.0" encoding="utf-8"?>
<LinearLayout xmlns:android="http://schemas.android.com/apk/res/android"
    xmlns:app="http://schemas.android.com/apk/res-auto"
    xmlns:tools="http://schemas.android.com/tools"
    android:layout_width="match_parent"
    android:layout_height="match_parent"
    android:orientation="vertical"
    tools:context="com.mejorprogramacion.layouts.LinearVertical">

    <TextView
        android:layout_width="match_parent"
        android:layout_height="wrap_content"
        android:gravity="center"
        android:text="mejorprogramacion.com" />

    <TextView
        android:id="@+id/textView"
        android:layout_width="match_parent"
        android:layout_height="wrap_content"
        android:text="TextView" />

    <EditText
        android:id="@+id/editText"
        android:layout_width="match_parent"
        android:layout_height="wrap_content"
        android:ems="10"
        android:inputType="textPersonName"
        android:text="Name" />

    <Button
        android:id="@+id/button"
        android:layout_width="match_parent"
        android:layout_height="wrap_content"
        android:text="Button" />

</LinearLayout>
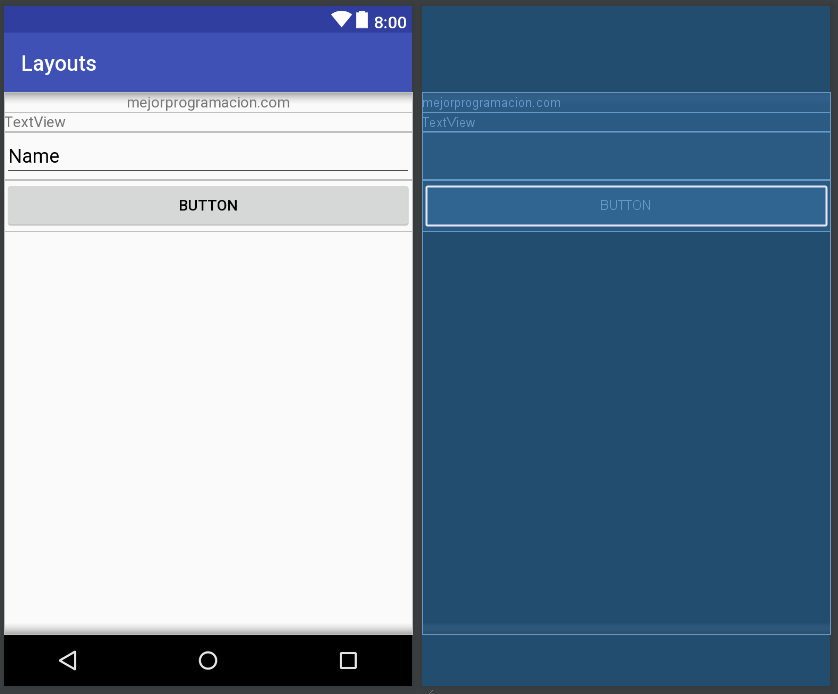
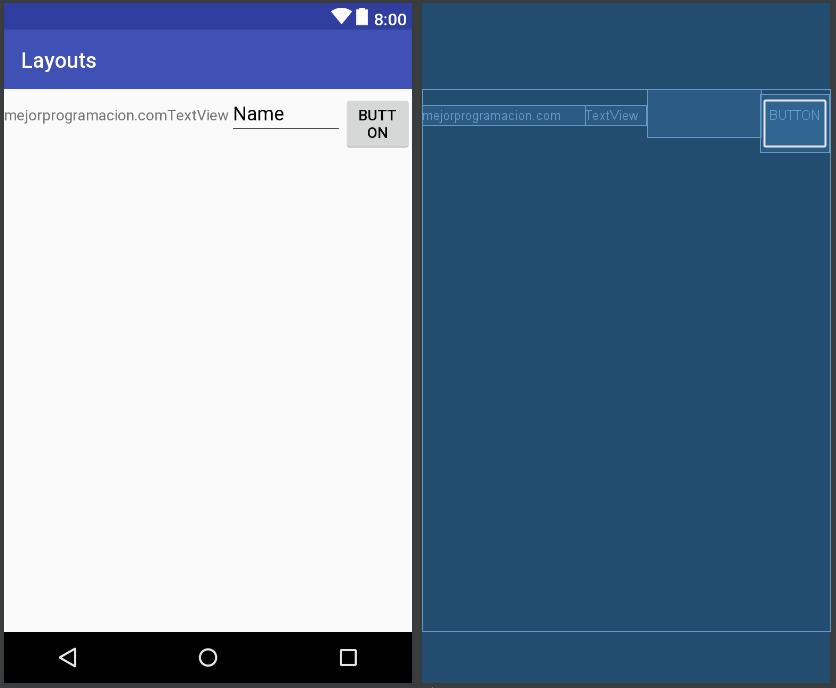
o puede ser horizontal (uno al lado de otro).
Poniendo la orientación en vertical u horizontal.
android:orientation="horizontal"
<?xml version="1.0" encoding="utf-8"?>
<LinearLayout xmlns:android="http://schemas.android.com/apk/res/android"
    xmlns:app="http://schemas.android.com/apk/res-auto"
    xmlns:tools="http://schemas.android.com/tools"
    android:layout_width="match_parent"
    android:layout_height="match_parent"
    tools:context="com.mejorprogramacion.layouts.LinearHorizontal"
    android:orientation="horizontal">

    <TextView
        android:layout_width="wrap_content"
        android:layout_height="wrap_content"
        android:gravity="center"
        android:text="mejorprogramacion.com" />

    <TextView
        android:id="@+id/textView"
        android:layout_width="wrap_content"
        android:layout_height="wrap_content"
        android:text="TextView" />

    <EditText
        android:id="@+id/editText"
        android:layout_width="wrap_content"
        android:layout_height="wrap_content"
        android:ems="5"
        android:inputType="textPersonName"
        android:text="Name" />

    <Button
        android:id="@+id/button"
        android:layout_width="wrap_content"
        android:layout_height="wrap_content"
        android:text="Button" />

</LinearLayout>
RelativeLayout
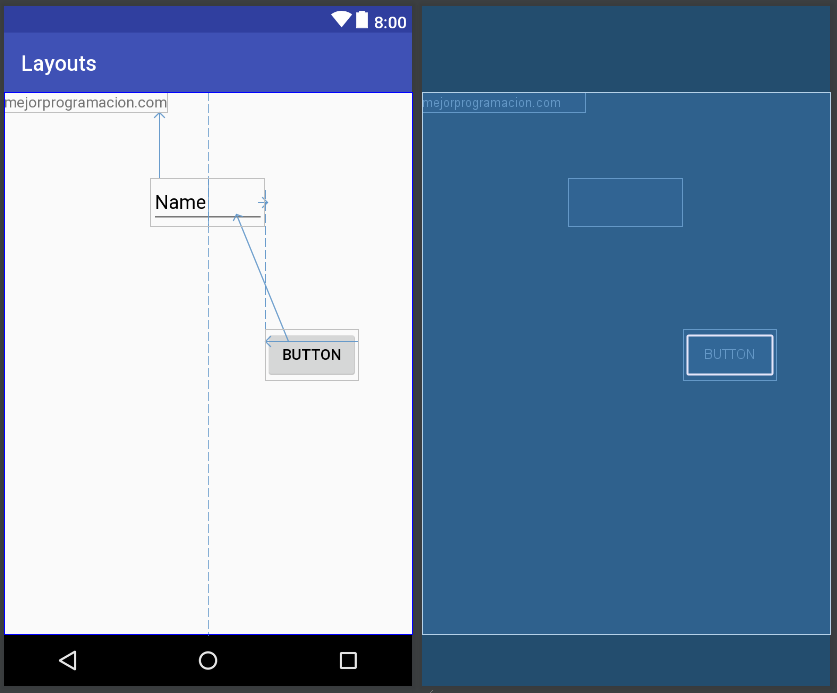
Este Layout posiciona los controles o elementos hijos de forma relativa entre unos y otros, por ejemplo: debajo de, o ala izquierda de.
<?xml version="1.0" encoding="utf-8"?>
<RelativeLayout xmlns:android="http://schemas.android.com/apk/res/android"
    xmlns:app="http://schemas.android.com/apk/res-auto"
    xmlns:tools="http://schemas.android.com/tools"
    android:layout_width="match_parent"
    android:layout_height="match_parent"
    tools:context="com.mejorprogramacion.layouts.Relative">

    <TextView
        android:layout_width="wrap_content"
        android:layout_height="wrap_content"
        android:gravity="center"
        android:text="mejorprogramacion.com"
        android:id="@+id/textView" />

    <EditText
        android:id="@+id/editText"
        android:layout_width="wrap_content"
        android:layout_height="wrap_content"
        android:layout_below="@+id/textView"
        android:layout_centerHorizontal="true"
        android:layout_marginTop="62dp"
        android:ems="5"
        android:inputType="textPersonName"
        android:text="Name" />

    <Button
        android:id="@+id/button"
        android:layout_width="wrap_content"
        android:layout_height="wrap_content"
        android:layout_below="@+id/editText"
        android:layout_marginTop="97dp"
        android:layout_toEndOf="@+id/editText"
        android:layout_toRightOf="@+id/editText"
        android:text="Button" />

</RelativeLayout>
TableLayout
Es una tabla definida (Filas y Columnas) en las que podemos poner los elementos, es muy parecido a una tabla en HTML.
Dentro de la etiqueta de éste Layout para cada fila o row debemos poner la etiqueta TableRow para cada fila.
<?xml version="1.0" encoding="utf-8"?>
<TableLayout xmlns:android="http://schemas.android.com/apk/res/android"
    xmlns:app="http://schemas.android.com/apk/res-auto"
    xmlns:tools="http://schemas.android.com/tools"
    android:layout_width="match_parent"
    android:layout_height="match_parent"
    tools:context="com.mejorprogramacion.layouts.Table">

    <TextView
        android:layout_width="wrap_content"
        android:layout_height="wrap_content"
        android:gravity="center"
        android:text="mejorprogramacion.com" />

    <TableRow>
        <TextView
            android:id="@+id/textView"
            android:layout_width="wrap_content"
            android:layout_height="wrap_content"
            android:text="TextView" />
        <EditText
            android:id="@+id/editText"
            android:layout_width="wrap_content"
            android:layout_height="wrap_content"
            android:ems="5"
            android:inputType="textPersonName"
            android:text="Name" />
    </TableRow>

    <TableRow>
        <Button
            android:id="@+id/button"
            android:layout_width="wrap_content"
            android:layout_height="wrap_content"
            android:text="Button" />
    </TableRow>

</TableLayout>

AbsoluteLayout
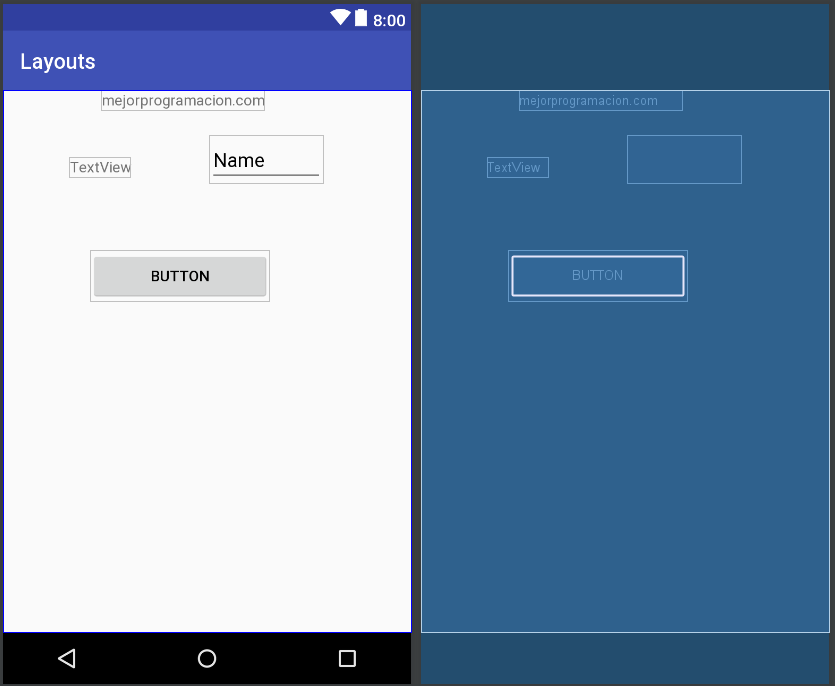
Posiciona los elementos de manera absoluta en pantalla según la posición indicada, seguramente es el Layout menos usado ya que dada la gran variedad en los tamaños de pantalla de los dispositivos móviles puede tener problemas en el total de área que se pueda mostrar en la pantalla, es decir, algunos elementos podrían no mostrarse por estar posicionados en un área que está por fuera de la pantalla.
Cuando seleccionamos éste Layout en Android Studio nos damos cuenta de que la etiqueta la pone tachada y esto significa que está obsoleta, si podemos utilizarla pero debemos evitar su uso por las razones que vimos anteriormente.
<?xml version="1.0" encoding="utf-8"?>
<AbsoluteLayout xmlns:android="http://schemas.android.com/apk/res/android"
    xmlns:app="http://schemas.android.com/apk/res-auto"
    xmlns:tools="http://schemas.android.com/tools"
    android:layout_width="match_parent"
    android:layout_height="match_parent"
    tools:context="com.mejorprogramacion.layouts.Absolute">

    <TextView
        android:layout_width="wrap_content"
        android:layout_height="wrap_content"
        android:layout_x="93dp"
        android:layout_y="0dp"
        android:gravity="center"
        android:text="mejorprogramacion.com" />

    <TextView
        android:id="@+id/textView"
        android:layout_width="wrap_content"
        android:layout_height="wrap_content"
        android:layout_x="63dp"
        android:layout_y="63dp"
        android:text="TextView" />

    <EditText
        android:id="@+id/editText"
        android:layout_width="wrap_content"
        android:layout_height="wrap_content"
        android:layout_x="194dp"
        android:layout_y="43dp"
        android:ems="5"
        android:inputType="textPersonName"
        android:text="Name" />

    <Button
        android:id="@+id/button"
        android:layout_width="169dp"
        android:layout_height="wrap_content"
        android:layout_x="82dp"
        android:layout_y="151dp"
        android:text="Button" />

</AbsoluteLayout>
FrameLayout
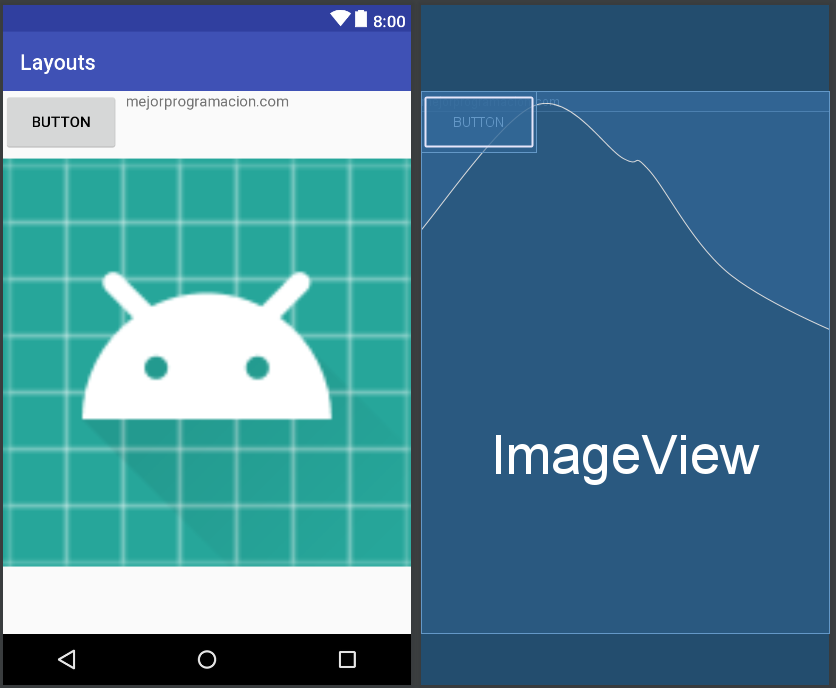
Coloca los elementos hijos uno detrás del otro alineados por la esquina superior izquierda.
<?xml version="1.0" encoding="utf-8"?>
<FrameLayout xmlns:android="http://schemas.android.com/apk/res/android"
    xmlns:app="http://schemas.android.com/apk/res-auto"
    xmlns:tools="http://schemas.android.com/tools"
    android:layout_width="match_parent"
    android:layout_height="match_parent"
    tools:context="com.mejorprogramacion.layouts.Frame">

    <TextView
        android:layout_width="match_parent"
        android:layout_height="wrap_content"
        android:gravity="center"
        android:text="mejorprogramacion.com" />

    <ImageView
        android:id="@+id/imageView"
        android:layout_width="match_parent"
        android:layout_height="match_parent"
        app:srcCompat="@mipmap/ic_launcher" />

    <Button
        android:id="@+id/button"
        android:layout_width="109dp"
        android:layout_height="58dp"
        android:text="Button" />

</FrameLayout>
ConstraintLayout
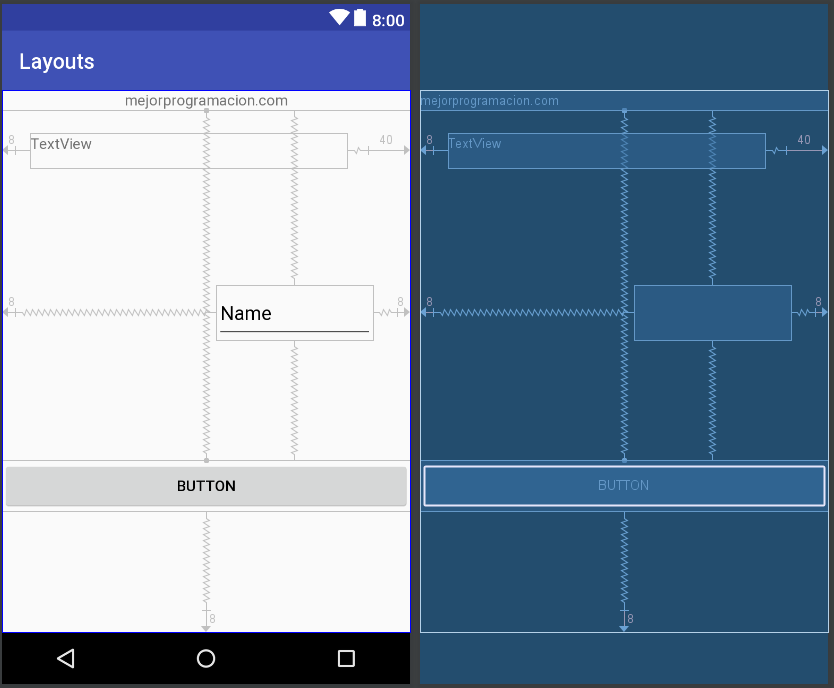
La ventaja que ofrece este Layout a la hora de diseñarlo es que puedes poner una relación de cada elemento con otros elementos o con el mismo Layout haciéndolo totalmente responsive, teniendo la seguridad de que el control o elemento se mantendrá en su posición relativa dentro de la pantalla sea cual sea su tamaño.
<?xml version="1.0" encoding="utf-8"?>
<android.support.constraint.ConstraintLayout xmlns:android="http://schemas.android.com/apk/res/android"
    xmlns:app="http://schemas.android.com/apk/res-auto"
    xmlns:tools="http://schemas.android.com/tools"
    android:layout_width="match_parent"
    android:layout_height="match_parent"
    tools:context="com.mejorprogramacion.layouts.Constraint">

    <TextView
        android:id="@+id/textView"
        android:layout_width="match_parent"
        android:layout_height="wrap_content"
        android:gravity="center"
        android:text="mejorprogramacion.com" />

    <TextView
        android:id="@+id/textView"
        android:layout_width="299dp"
        android:layout_height="33dp"
        android:layout_marginEnd="40dp"
        android:layout_marginStart="8dp"
        android:text="TextView"
        app:layout_constraintEnd_toEndOf="parent"
        app:layout_constraintStart_toStartOf="parent"
        tools:layout_editor_absoluteY="41dp" />

    <EditText
        android:id="@+id/editText"
        android:layout_width="148dp"
        android:layout_height="52dp"
        android:layout_marginBottom="8dp"
        android:layout_marginEnd="8dp"
        android:layout_marginStart="8dp"
        android:layout_marginTop="20dp"
        android:ems="5"
        android:inputType="textPersonName"
        android:text="Name"
        app:layout_constraintBottom_toTopOf="@+id/button"
        app:layout_constraintEnd_toEndOf="parent"
        app:layout_constraintHorizontal_bias="0.881"
        app:layout_constraintStart_toStartOf="parent"
        app:layout_constraintTop_toBottomOf="@+id/textView"
        app:layout_constraintVertical_bias="0.464" />

    <Button
        android:id="@+id/button"
        android:layout_width="match_parent"
        android:layout_height="wrap_content"
        android:layout_marginBottom="8dp"
        android:layout_marginTop="168dp"
        android:text="Button"
        app:layout_constraintBottom_toBottomOf="parent"
        app:layout_constraintTop_toBottomOf="@+id/textView"
        tools:layout_editor_absoluteX="0dp" />

</android.support.constraint.ConstraintLayout>
![]()